Save
Save My friend texted me two weeks before her graduation that she needed a cake celebrating both her birthday and her achievement, and she wanted it to feel special—like the moment deserved something beautiful. I'd never made a floral cake before, but something about the combination of vanilla layers and painted buttercream flowers seemed to match the mood perfectly: elegant but not pretentious, celebratory without being over the top. The first time I piped those delicate petals, my hand shook a little, partly from the pressure of getting it right and partly from the joy of creating something so deliberately lovely for someone I cared about.
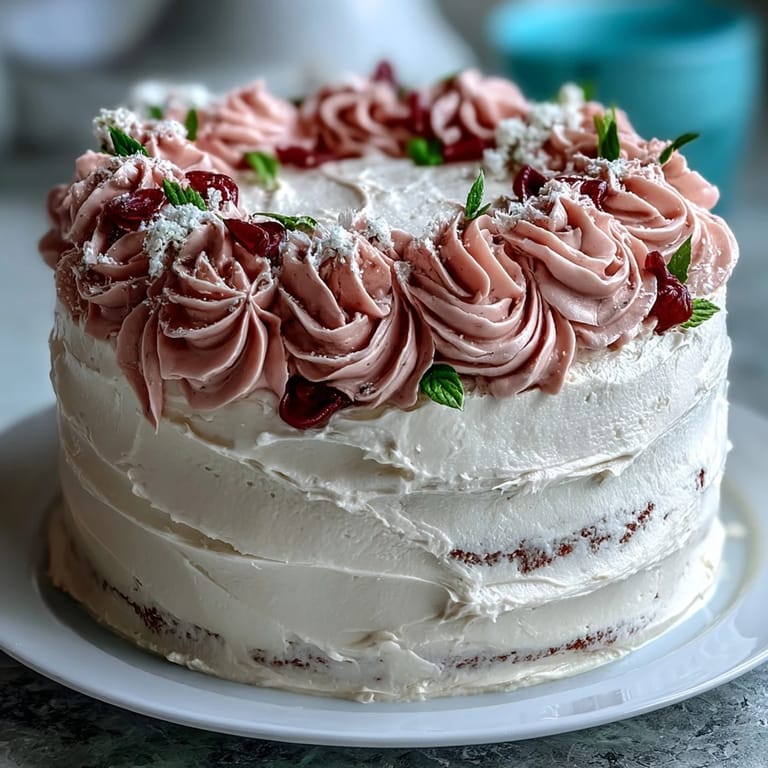
I'll never forget watching her face when I carried this cake into the room—three perfectly level layers crowned with roses, peonies, and delicate green leaves in soft pinks and purples. She laughed and said it was almost too pretty to cut, but then she did anyway, and the room filled with the warm vanilla scent of something genuinely homemade. That's when I realized the real magic wasn't in the gold leaf accent or the technical piping; it was in the act of spending hours making something beautiful just because someone mattered.
Ingredients
- All-purpose flour (2 1/2 cups): The foundation of a tender crumb; make sure it's not packed down when you measure, or sift it first if you want to be cautious.
- Baking powder (2 1/2 tsp): This lifts the cake so each layer rises evenly and stays light; double-check the expiration date because old baking powder won't give you the rise you need.
- Salt (1/2 tsp): Just a pinch, but it balances the sweetness and deepens the vanilla flavor in a way you won't consciously taste but will definitely notice if it's missing.
- Unsalted butter (1 cup plus 1 1/2 cups for frosting): Always use unsalted so you control the salt level; room temperature butter creams smoothly and incorporates air better than cold butter.
- Granulated sugar (2 cups): This sweetens the cake and helps create that light, fluffy texture when beaten with butter; don't skip the creaming step.
- Large eggs (4), room temperature: Cold eggs won't incorporate smoothly and can cause the batter to break; let them sit on the counter for 20 minutes before using.
- Pure vanilla extract (1 tbsp plus 2 tsp): The soul of this cake; pure extract tastes immeasurably better than imitation, especially in something this simple.
- Whole milk (1 cup), room temperature: This keeps the cake tender and moist; cold milk can shock the warm batter and affect the texture.
- Powdered sugar (5 cups), sifted: Sifting eliminates lumps that would make your buttercream grainy; you can sift it right before using or store it pre-sifted in an airtight container.
- Heavy cream or milk (2-4 tbsp): This adjusts the frosting consistency from stiff to spreadable; add it slowly because you can always add more but can't take it out.
- Gel food coloring (various floral shades): Gel colors are concentrated and won't thin your frosting the way liquid colors do; a tiny dot goes a long way.
- Edible gold leaf or gold sprinkles (optional): These add a touch of Taurus luxury and catch the light beautifully on the finished cake.
Tired of Takeout? 🥡
Get 10 meals you can make faster than delivery arrives. Seriously.
One email. No spam. Unsubscribe anytime.
Instructions
- Prepare your pans and preheat:
- Set your oven to 350°F and line three 8-inch round pans with parchment paper; this prevents sticking and lets you slide the cooled cakes out without tearing them. Greasing the sides helps the papers stay put.
- Mix your dry ingredients:
- Whisk flour, baking powder, and salt together in a bowl; this distributes the leavening evenly so your cake rises uniformly. A wire whisk works better than a fork because it breaks up any little clumps.
- Cream butter and sugar:
- Beat room-temperature butter with sugar on medium speed for 3 to 4 minutes until it looks light, pale, and slightly fluffy; this incorporates air bubbles that make the cake tender. Stop and scrape the bowl halfway through to make sure everything's combining evenly.
- Add eggs one at a time:
- Drop in one egg, beat until it disappears into the mixture, then add the next; rushing this step or adding them all at once can cause the batter to look curdled and break. Each egg should fully incorporate before you add the next one.
- Mix in vanilla:
- Add vanilla extract and beat for another 10 to 15 seconds; this distributes the flavor throughout the batter so you taste it in every bite.
- Alternate flour and milk:
- Add the flour mixture and milk in three batches—flour, milk, flour, milk, flour—starting and ending with flour. Mix just until combined after each addition; overworking the batter at this stage develops gluten and makes the cake tough instead of tender.
- Divide and smooth:
- Divide the batter evenly among the three pans and smooth the tops with an offset spatula; if the layers bake unevenly, they won't stack smoothly, so try to get them as level as possible.
- Bake until golden:
- Bake for 28 to 35 minutes until a toothpick inserted in the center comes out clean or with just a few moist crumbs; overbaking is the enemy of moisture, so check at 28 minutes and watch carefully. The tops should be golden and spring back slightly when you touch them.
- Cool and turn out:
- Let the cakes cool in their pans for 10 minutes, then turn them out onto wire racks to cool completely; this stops them from cooking further in the residual heat. If you turn them out too early, they'll break; too late and they'll stick to the pan.
- Make the buttercream base:
- Beat softened butter on medium speed until it's creamy and pale, about 2 minutes, then gradually add sifted powdered sugar while mixing; this prevents lumps and keeps the frosting smooth. Add vanilla and 2 tablespoons of cream and beat for 3 to 4 minutes until it's fluffy.
- Adjust consistency:
- If the frosting is too thick to spread, add a splash more cream; if it's too soft, refrigerate it for 15 minutes. You want it thick enough to hold a shape but soft enough to pipe without fighting.
- Color your frosting:
- Divide the buttercream into small bowls and tint each with gel coloring—use a toothpick to pick up a tiny dot and stir it in, then add more if you need deeper color. Save some white frosting for filling the layers and creating a clean crumb coat.
- Level and stack:
- If your cooled cakes have domed tops, use a serrated knife to level them so they sit flat; this makes stacking easier and the cake won't wobble. Place the first layer on your serving plate, add a dollop of frosting in the center, and spread it to the edges.
- Build the layers:
- Repeat with the second layer, then top with the third; take a step back and look at it from the side to make sure it's reasonably level before moving to the crumb coat step.
- Apply the crumb coat:
- Spread a very thin layer of white buttercream all over the cake to seal in the crumbs, then chill for 20 minutes; this creates a clean canvas for your final frosting layer. You should barely see the cake through this layer.
- Final frosting coat:
- Apply a second, thicker layer of white buttercream smoothly around the entire cake; chill again for 10 minutes if you want to chill before decorating, or proceed directly to piping.
- Pipe your flowers:
- Fill piping bags with your colored buttercreams and use petal tips for rose and peony shapes, small round tips for flower centers, and leaf tips for greenery; start piping from the top and work your way down so you don't accidentally touch finished flowers. Practice one flower on the side of the cake before committing to the front.
- Add finishing touches:
- Sprinkle or carefully place edible gold leaf around the flowers or on a small section of the cake for a touch of Taurus luxury; this catches the light and adds sophistication. Step back and assess before you add too much—sometimes less is more.
- Chill and serve:
- Refrigerate the finished cake until about 30 minutes before serving so it holds its shape and the frosting sets. Bring it to room temperature before slicing so the flavors shine and the texture is soft.
 Save
Save There's something about watching someone eat something you've made with your hands and your time—it shifts from dessert to a small declaration. When she bit into that first slice and closed her eyes and said it was perfect, I realized I'd made the right choice in spending an afternoon on something that would be consumed in minutes. That's the whole point, isn't it: feeding people you love in a way that says, "I thought about this, about you, about making this moment taste like care."
On Timing and Preparation
This cake can be made entirely a day or two ahead if you wrap each layer individually and store it in an airtight container in the fridge; the flavors actually deepen slightly and the layers are easier to frost when cold. The buttercream can be made up to three days in advance and kept in a sealed container in the fridge, then brought to room temperature and re-whipped for 30 seconds before using. If you're piping intricate flowers, you can make them on parchment paper ahead of time, chill them until they're firm, then gently transfer them to the cake—this takes pressure off the actual decorating day.
Personalizing for Your Graduate
Match your flower colors to the graduate's school colors or their birth month flower for an extra layer of thoughtfulness that shows you planned this. The Taurus symbol (the bull) can be piped in gold or placed on top as a small gold accent, or you could swap the bull for their graduation cap or school mascot if that feels more celebratory. If the person has a favorite color, tint more of the frosting that shade and let it dominate the design; a cake that reflects their taste feels more personal than a generic floral arrangement.
Storage and Serving Suggestions
This cake keeps beautifully in the fridge for up to four days wrapped loosely in plastic wrap or stored in a cake box; the frosting protects the cake from drying out. Serve it at room temperature so the flavors are vibrant and the texture is soft; bringing it out 30 minutes before slicing makes a difference. Pair slices with sparkling wine, floral tea, or simply cold milk—the vanilla cake is delicate enough to complement almost any beverage without overwhelming it.
- If you're traveling with this cake, keep it in a cooler during transport and chill it for at least an hour after arrival before serving so the frosting sets.
- Leftover cake keeps in an airtight container for three to four days, and individual slices can be frozen for up to a month if you want to save a piece.
- If your frosting starts to soften during decorating, pop the cake in the fridge for 10 minutes to firm everything up.
 Save
Save A cake this beautiful and delicious becomes more than dessert—it becomes a memory you're creating for someone on a day that matters. Bake it with joy and watch what happens when you set it on the table.
Recipe Questions & Answers
- → How do I achieve smooth vanilla cake layers?
Ensure ingredients are at room temperature, mix butter and sugar until fluffy, and alternate adding flour and milk gently to avoid overmixing.
- → What is the best way to create floral buttercream designs?
Use gel food coloring to tint small buttercream batches and piping bags fitted with petal, leaf, and round tips to shape flowers and leaves.
- → Can I prepare the buttercream decorations ahead of time?
Yes, pipe floral decorations on parchment, chill until firm, then transfer carefully onto the cake for detailed designs.
- → How should I store the finished cake?
Chill the cake to set the buttercream, then bring it to room temperature before slicing for best flavor and texture.
- → Are there optional flavor enhancements for the cake?
Adding 1 teaspoon of almond extract to the batter adds subtle complexity without overpowering the vanilla base.